ASP.NET Repeater with jQuery Dialog Popup : Reading Data from a WebMethod

ASP.NET Repeater with jQuery Popup with WebMethod

ASP.NET Repeater with jQuery Popup with WebMethod

Introduction

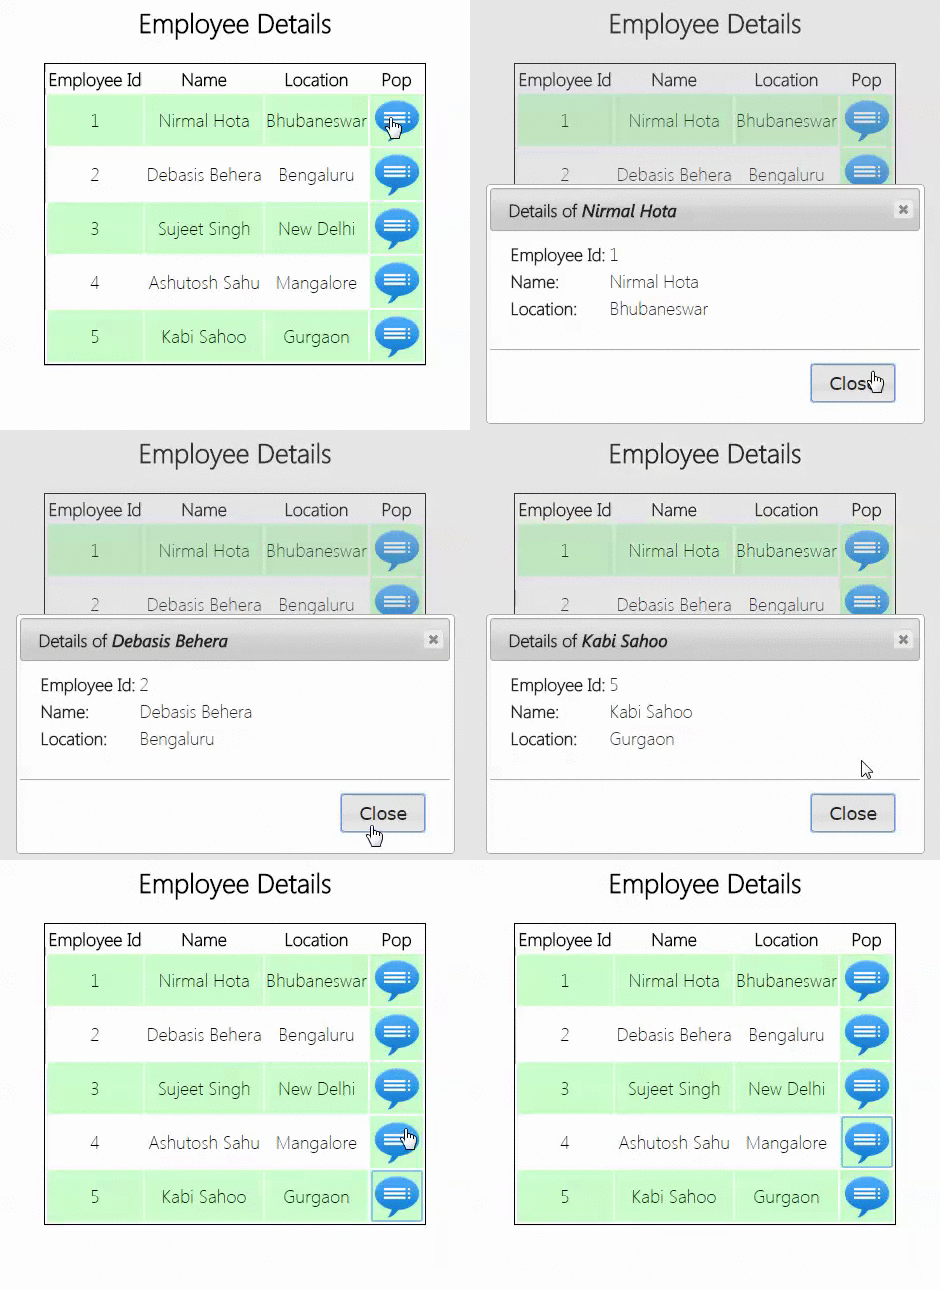
This blog will take you through the steps to call a simple WebMethod to get the details of one record shown on a Repeater and show the retrieved details on jQuery Dialog popup.

Background

This can be considered as a second part of the article series where I am dealing with Repeaters and Dialogs. The first part was – ASP.NET Repeater with jQuery Dialog Popup.

Walk Through

First of all, follow all the steps as described on the previous article I mentioned above to design the Repeater and bind data to it. You can also download the project and start coding on that. After you are done with it, you will find one jQuery code which is called on the Image Button Click. Inside this event, we are trying to get the row which is clicked and finding all the values of that row so that we can display on the jQuery Popup.

// ImageButton Click Event.
$('#tblEmployeeDetails .imgButton').click(function () {
	// Get the Current Row and its values.
	var currentRow = $(this).parents("tr");
	var empId = currentRow.find("span[id*='lblEmployeeId']").text();
	var empName = currentRow.find("span[id*='lblName']").text();
	var empLocation = currentRow.find("span[id*='lblLocation']").text();

	// Populate labels inside the dailog.
	$("#lblEmpId").text(empId);
	$("#lblEmpName").text(empName);
	$("#lblEmpLocation").text(empLocation);

	// Open the dialog.
	$("#popupdiv").dialog({
		title: "Details of <em>" + empName + "</em>",
		width: 430,
		height: 240,
		modal: true,
		buttons: {
			Close: function () {
				$(this).dialog('close');
			}
		}
	});

	return false;
});

What’s Next?

We will now remove the highlighted lines above and try to get these values from server by calling a WebMethod. We will also fetch another extra thing about the employee that is “Biography”.

When a method is decorated with [WebMethod] attribute, that is actually exposed as a XML Web Service. Read more (on how to deal with WebMethods in jQuery) here.

Alright, let’s alter our code a bit to call our WebMethod.

// ImageButton Click Event.
$('#tblEmployeeDetails .imgButton').click(function () {
	// Get the Current Row and its values.
	var currentRow = $(this).parents("tr");
	var empId = currentRow.find("span[id*='lblEmployeeId']").text();
        $("#lblEmpId").text(empId);

	$.ajax({
		url: 'RepeaterWithjQueryPopup.aspx/GetEmployeeDetails',
		data: '{ employeeId: ' + empId + '  }',
		type: 'POST',
		contentType: "application/json; charset=utf-8",
		dataType: 'json',
		success: function (result) {
			if (result.d.length > 0) {
				var employee = $.parseJSON(result.d);

				// Populate labels inside the dailog.
				$("#lblEmpName").text(employee.Name);
				$("#lblEmpLocation").text(employee.Location);
				$("#lblEmpBiography").text(employee.Biography);

				// Open the dialog.
				$("#popupdiv").dialog({
					title: "Details of <em>" + employee.Name + "</em>",
					width: 430,
					height: 270,
					modal: true,
					buttons: {
						Close: function () {
							$(this).dialog('close');
						}
					}
				});
			}
		},
		error: function (xhr) {
			alert('error');
		}
	});

	return false;
});

url: ‘RepeaterWithjQueryPopup.aspx/GetEmployeeDetails’

Indicates the URL of the WebMethod, which is “RepeaterWithjQueryPopup.aspx/GetEmployeeDetails“. This is in the format {PageName/WebMethodName}.

data: ‘{ employeeId: ‘ + empId + ‘ }’

Indicates that we are passing the employee id of the row which is clicked. This will help us to get the record of this particular employee.

In Success Method

When WebMethod returns the result in form of a object, we parse it and then we just read the properties and assign it to the labels inside the popup. For parsing, I have used jQuery.parseJSON(), which converts the object to a JSON object so that we can read it very easily.

var employee = $.parseJSON(result.d);

$("#lblEmpName").text(employee.Name);
$("#lblEmpLocation").text(employee.Location);
$("#lblEmpBiography").text(employee.Biography);

Have a look on the WebMethod Code

[WebMethod]
public static string GetEmployeeDetails(string employeeId)
{
	DataTable dtEmployees = GetAllEmployees();
	DataRow[] employeeRow = dtEmployees.Select("EmployeeId = " + employeeId);

	if (employeeRow.Length > 0)
	{
		var row = new Dictionary<string, string>
		{
			{"Name", employeeRow[0]["Name"].ToString()},
			{"Location", employeeRow[0]["Location"].ToString()},
			{"Biography", employeeRow[0]["Biography"].ToString()}
		};

		var serializer = new JavaScriptSerializer();

		return serializer.Serialize(row);
	}

	return string.Empty;
}

First of all we are getting all employees and then filtering out the employee which is needed by the employeeId, which is passed from the client side Ajax call. Then we are making a dictionary object with the property name and value. After this, this is just a matter of serializing it with the help of JavaScriptSerializer and send it back to client to parse and operate on it.

Your Views

Feel free to download the project and play on top of it. Should you have any queries, do let me know by commenting below. Let’s interact and code!!! Share among your friends, if you like it.

How to Select All Text in a TextBox on focus?

Select all Text in Safari

Select all Text in Safari

Introduction

This is small tip, yet very useful when you want to select all text inside a TextBox.

Background

This was a requirement for which I researched a lot and tested on multiple browsers and devices. Let me share the problem and solution below.

Problem

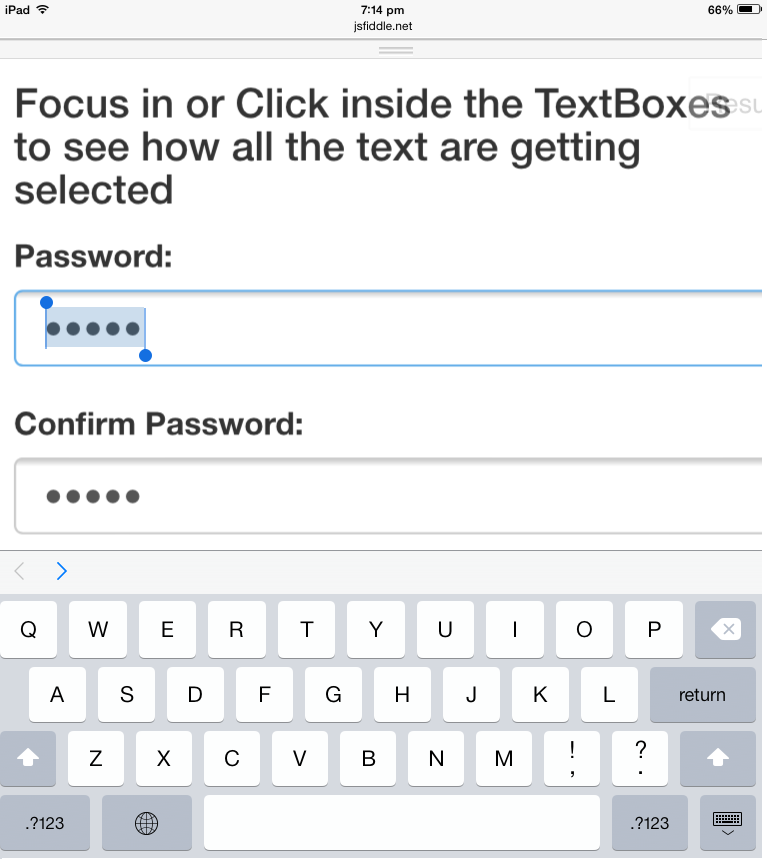
When profile page is shown for a user, the password fields are also populated. The characters in a password field are masked (shown as asterisks or circles). So, typical user experience would be to select all text when you click or focus into these fields, as user can’t see the password, he/she will definitely change the whole password. Therefore, the problem is to select all the text inside the password fields.

Solution

We are going to use jQuery for this task. Solution is not so straight forward as it seems. So, the first thing comes into mind is to handle the focus event. Yes, of course, we will use that. So, the code would look like below…

$('#txtPassword').on('focus', function () {
    this.select();
});

But this is not a cross browser solution and will fail in Safari.

So, what is cross browser?

Very tricky actually. We need to specify how much text we need to select. We can specify that using the selectionStart and selectionEnd properties.

$('#txtPassword').on('focus', function () {
    this.selectionStart = 0;
    this.selectionEnd = this.value.length;
});

Now, one last thing. We need to prevent mouseup event, because that is fired automatically after focus, which deselects all the text.

$('#txtPassword').on('focus', function () {
    this.selectionStart = 0;
    this.selectionEnd = this.value.length;
});
$("#txtPassword").on('mouseup', function (e) {
    e.preventDefault();
});

Full Demo

[Demo] Select All Text in a TextBox on focus

If you have any queries, do visit my blog and drop me a Contact Tadit Dash request.

ASP.NET Repeater with jQuery Dialog Popup

ASP.NET Repeater with jQuery Dialog Popup

ASP.NET Repeater with jQuery Dialog Popup

Introduction

This blog will take you through the steps to create a ASP.NET Repeater and show the details of a particular row on jQuery Dialog popup.

Background

I was quite a bit into the Repeater control, when I wrote ASP.NET Repeater with jQuery Slider. It is a very useful control to repeat items with well formatted HTML designs. While going through forums, I found members asking questions on opening a popup from the Repeater Row and show details inside that. So, I thought of implementing this with jQuery UI Dialog. Later I will come up with other techniques to do this task.

Let’s Start !!!

Step-1 : Add ASP.NET Repeater Control on aspx Page

We will show the following details for some demo Employees on Repeater.

  1. Employee Id
  2. Name
  3. Location

Let’s see how the design will look like. I will explain different parts of the ASP.NET Repeater.

HeaderTemplate

So, inside the HeaderTemplate, I have defined the table and the header rows with Column Names.

<HeaderTemplate>
	<table id="tblEmployeeDetails" 
         style="border: 1px solid; margin-left: auto; margin-right: auto;">
		<tr>
			<th>
				Employee Id
			</th>
			<th>
				Name
			</th>
			<th>
				Location
			</th>
			<th>
				Pop
			</th>
		</tr>
</HeaderTemplate>

ItemTemplate

Then in ItemTemplate, the data rows are defined with proper Label Tags to hold the column values inside table data (td). The labels are getting values by Eval expressions.

For instance - Text='<%# Eval("EmployeeId") %>' binds the EmployeeId to the Label's Text..
<ItemTemplate>
	<tr>
		<td bgcolor="#CCFFCC">
			<asp:Label runat="server" ID="lblEmployeeId" Text='<%# Eval("EmployeeId") %>' />
		</td>
		<td bgcolor="#CCFFCC">
			<asp:Label runat="server" ID="lblName" Text='<%# Eval("Name") %>' />
		</td>
		<td bgcolor="#CCFFCC">
			<asp:Label runat="server" ID="lblLocation" Text='<%# Eval("Location") %>' />
		</td>
		<td bgcolor="#CCFFCC">
			<asp:ImageButton ID="imbShowDetails" class="imgButton" Height="50" 
                             runat="server" ImageUrl="images/popup.png" />
		</td>
	</tr>
</ItemTemplate>

AlternatingItemTemplate

AlternatingItemTemplate is used so that alternate rows can be displayed differently. The same columns are copied but doesn’t have bgcolor added to them.

<AlternatingItemTemplate>
	<tr>
		<td>
			<asp:Label runat="server" ID="lblEmployeeId" Text='<%# Eval("EmployeeId") %>' />
		</td>
		<td>
			<asp:Label runat="server" ID="lblName" Text='<%# Eval("Name") %>' />
		</td>
		<td>
			<asp:Label runat="server" ID="lblLocation" Text='<%# Eval("Location") %>' />
		</td>
		<td bgcolor="#CCFFCC">
			<asp:ImageButton ID="imbShowDetails" class="imgButton" Height="50" 
                             runat="server" ImageUrl="images/popup.png" />
		</td>
	</tr>
</AlternatingItemTemplate>

FooterTemplate

Last, but not the least, inside FooterTemplate we will close the table.

<FooterTemplate>
	</table>
</FooterTemplate>

For the whole code, download the project from the link given at the top of this blog post.

Step-2 : Bind Repeater from Code Behind

Pretty simple. Inside BindEmployees(), we are just creating a DataTable with required columns and adding some demo records.

protected void Page_Load(object sender, EventArgs e)
{
	if (!IsPostBack)
	{
		BindEmployees();
	}
}

private void BindEmployees()
{
	// Create DataTable and add Columns.
	DataTable dtEmployees = new DataTable();
	dtEmployees.Columns.Add("Name", typeof(string));
	dtEmployees.Columns.Add("EmployeeId", typeof(int));
	dtEmployees.Columns.Add("Location", typeof(string));

	// Add demo Rows.
	dtEmployees.Rows.Add("Nirmal Hota", 1, "Bhubaneswar");
	dtEmployees.Rows.Add("Debasis Behera", 2, "Bengaluru");
	dtEmployees.Rows.Add("Sujeet Singh", 3, "New Delhi");
	dtEmployees.Rows.Add("Ashutosh Sahu", 4, "Mangalore");
	dtEmployees.Rows.Add("Kabi Sahoo", 5, "Gurgaon");

	// Bind the Repeater.
	rptEmployees.DataSource = dtEmployees;
	rptEmployees.DataBind();
}

Step-3 : Design the Dialog Popup Div

We will design a very simple table to show the details of a particular row on ImageButton Click Event. Below is the HTML of the popup div.

<div id="popupdiv" style="display: none">
	<table>
		<tbody>
			<tr>
				<td>
					<label class="label">
						Employee Id:</label>
				</td>
				<td>
					<label id="lblEmpId">
					</label>
				</td>
			</tr>
			<tr>
				<td>
					<label class="label">
						Name:</label>
				</td>
				<td>
					<label id="lblEmpName">
					</label>
				</td>
			</tr>
			<tr>
				<td>
					<label class="label">
						Location:</label>
				</td>
				<td>
					<label id="lblEmpLocation">
					</label>
				</td>
			</tr>
		</tbody>
	</table>
</div>

NOTE : The highlighted labels will be populated with the row values when you click the popup image. We will explore more on this in the next step.

Step-4 : Define ImageButton Click Event for the Dialog

Prerequisites

Going further, we will be adding jQuery codes. So, we need jQuery reference. As we will deal with jQuery Dialog, we also need jQueryUI reference. Below is the references we need to add to our page.

<link type="text/css" rel="stylesheet" href="http://code.jquery.com/ui/1.10.3/themes/smoothness/jquery-ui.css" />
<script type="text/javascript" src="http://code.jquery.com/jquery-1.8.2.js"></script>
<script type="text/javascript" src="http://code.jquery.com/ui/1.10.3/jquery-ui.js"></script>

Now we are ready for the click event of ImageButton. Let’s start writing.

Define Click Event for all ImageButtons

First of all, we need to attach click events for all the ImageButtons rendered on Repeater rows. To do that, we will select all the ImageButtons having a common class .imgButton inside the Employees Table that is tblEmployeeDetails. So, the selector will be…

$('#tblEmployeeDetails .imgButton')

This will select all the ImageButtons inside the Employees table.
Now, attach click event to it as given below.

$('#tblEmployeeDetails .imgButton').click(function () {
    // We will write all logic here.
});

Get the Current Row where Image is clicked

See the picture below which shows the rendered HTML for the Repeater.

Repeater HTML Rendered on Browser

Repeater HTML Rendered on Browser


So, let’s get the parent “tr” of the ImageButton first so that later we can access all the values inside it as shown above. To get the parent tr, we will use .parents with selector “tr”. See code below.

$('#tblEmployeeDetails .imgButton').click(function () {
    // Get the Current Row.
    var currentRow = $(this).parents("tr");
});

Find the Row Values

Now this is very easy. We just need to find the values by the id of labels. I have use .find with proper selector. The selector is formed with the help of Attribute Contains Selector [name*=”value”]. That is because

$('#tblEmployeeDetails .imgButton').click(function () {
	// Get the Current Row and its values.
	var currentRow = $(this).parents("tr");
	var empId = currentRow.find("span[id*='lblEmployeeId']").text();
	var empName = currentRow.find("span[id*='lblName']").text();
	var empLocation = currentRow.find("span[id*='lblLocation']").text();
});

Open the Dialog

Just need to call jQuery dialog Event for the div popupdiv.

// ImageButton Click Event.
$('#tblEmployeeDetails .imgButton').click(function () {
	// Get the Current Row and its values.
	var currentRow = $(this).parents("tr");
	var empId = currentRow.find("span[id*='lblEmployeeId']").text();
	var empName = currentRow.find("span[id*='lblName']").text();
	var empLocation = currentRow.find("span[id*='lblLocation']").text();

	// Populate labels inside the dailog.
	$("#lblEmpId").text(empId);
	$("#lblEmpName").text(empName);
	$("#lblEmpLocation").text(empLocation);

	// Open the dialog.
	$("#popupdiv").dialog({
		title: "Details of <em>" + empName + "</em>",
		width: 430,
		height: 240,
		modal: true,
		buttons: {
			Close: function () {
				$(this).dialog('close');
			}
		}
	});

	return false;
});

Notes

  1. Line 16: Here to make the empName italics I have assigned em tags. But HTML tags are not supported in dialog title. To support that, I have added one prototype as given below, which will just assign the title text to the title html.
    // Prototype to assign HTML to the dialog title bar.
    $.widget('ui.dialog', jQuery.extend({}, jQuery.ui.dialog.prototype, {
    	_title: function (titleBar) {
    		titleBar.html(this.options.title || ' ');
    	}
    }));
    
  2. Line 27: We are returning false, otherwise page will post back and the modal will play hide and seek. 🙂

Conclusion

Uff !!! So much code. Let me know, if you liked the blog or not. Should you have any questions or need any help, please feel free to add a comment below or contact me. I will reply and together we will resolve issues.

Don’t forget to share this post with your friends and colleagues. You just need to click share buttons displayed below.

Happy coding !!! 🙂

Rounded Button for jQuery ColorPicker

Square to Rounded Button

Square to Rounded Button

Introduction

In this blog, we will explore the trick to replace the default square ColorPicker Button with a rounded one.

Background

One recent requirement lead to this research, where rounded button was needed instead of the default square one.

Step by Step

We will use ColorPicker plugin for our task. Let’s start coding.

Step-1: Add Plugin References

You need to refer jQuery and ColorPicker Plugin references.
We need

  1. jQuery
  2. jQuery UI (js and CSS)
  3. ColorPicker (js and CSS)
<script src="https://ajax.googleapis.com/ajax/libs/jquery/2.1.1/jquery.min.js" type="text/javascript" charset="utf-8"></script>
<script src="https://ajax.googleapis.com/ajax/libs/jqueryui/1.11.1/jquery-ui.min.js" type="text/javascript" charset="utf-8"></script>
<script src="js/evol.colorpicker.min.js" type="text/javascript" charset="utf-8"></script>

<link rel="stylesheet" type="text/css" href="http://ajax.googleapis.com/ajax/libs/jqueryui/1.11.1/themes/ui-lightness/jquery-ui.css">
<link href="css/evol.colorpicker.css" rel="stylesheet" type="text/css">

You can use the online googleapi links, otherwise download and use from the official jQuery Site. For ColorPicker, Save the files from GitHub Source and use it in your project. According to the code, there is a js folder, where evol.colorpicker.min.js is present and css folder, where evol.colorpicker.css is stored. Please be careful with the paths to the files, otherwise it won’t work.

Step-2: Add Input Control for ColorPicker

Just add a TextBox with HTML input tag.

<input type="text" id="mycolor" />

Step-3: Script for ColorPicker

$(document).ready(function () {
    // Initiate the ColorPicker
    $("#mycolor").colorpicker({
        color: "#ff0000"
    });
});

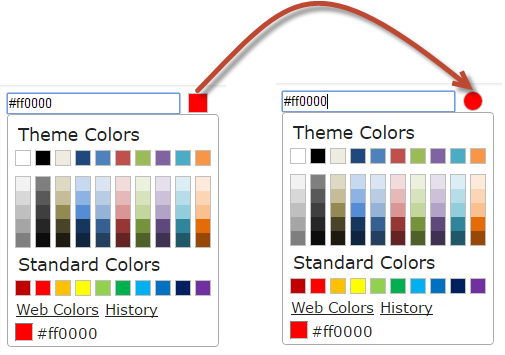
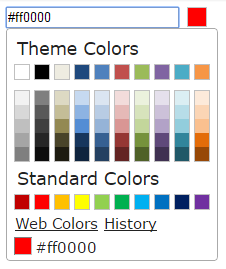
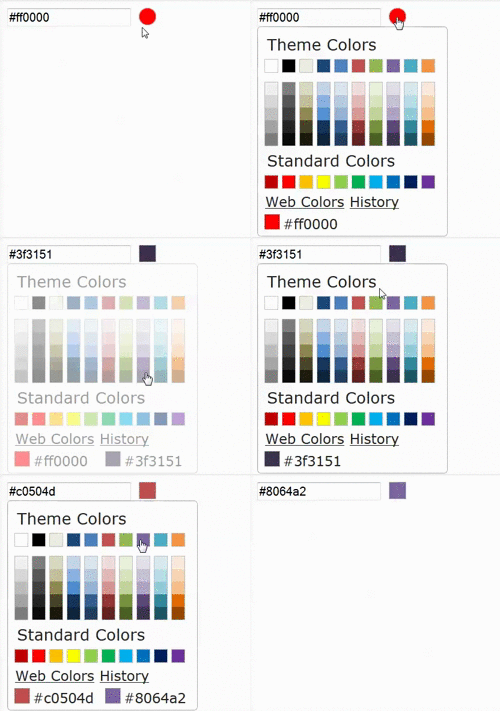
Now, if you click on the TextBox or the “square button”(next to the TextBox), it will show you a widget below to that to pick a color. Picture shown below.

ColorPicker Square Button

ColorPicker Square Button

Step-4: Inspect the HTML ColorPicker Source

When you inspect the area which shows the ColorPicker along with the TextBox, you will get the below div.

<div style="width:201px;">
    <input type="text" id="mycolor" class="colorPicker evo-cp0">
    <div class="evo-pointer evo-colorind" style="background-color:#ff0000"></div>
</div>

So, it surrounded the input with a div and inside that it added another div (see highlighted), which is the button. Now we just need to change it to round. Is it easy? Let’s explore in the next step.

Step-5: Assign Border Radius to the Button Div

Let’s add CSS property border-radius to the button div having classes evo-pointer evo-colorind. I have just selected the div by one class, that is evo-pointer

$(document).ready(function () {
    // Initiate the ColorPicker
    $("#mycolor").colorpicker({
        color: "#ff0000"
    });

    // Add radius to the div containing the button
    $(".evo-pointer").css("border-radius", "15px");
});

The HTML changes to the below with border-radius: 15px; added to the style.

<div style="width:201px;">
    <input type="text" id="mycolor" class="colorPicker evo-cp0">
    <div class="evo-pointer evo-colorind" style="border-radius: 15px; background-color: rgb(255, 0, 0);">
    </div>
</div>

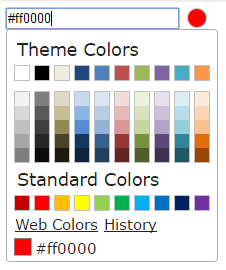
Wow !!! It is done. See the picture below.

ColorPicker Rounded Button

ColorPicker Rounded Button


Is it done? No, not yet. Hold on. Let’s test. If you select any color from the widget, then you will see that the button again reverts to the square one. The reason is the button div is dynamically assigned each time you select any color from the picker. The HTML reverts back to the original.

<div style="width:201px;">
    <input type="text" id="mycolor" class="colorPicker evo-cp0">
    <div class="evo-pointer evo-colorind" style="background-color:#f79646">
    </div>
</div>

Here border-radius: 15px; is now missing.
Watch how the button is changing again to square in below gif.

Rounded Button Changed to Square

Rounded Button Changed to Square

Step-5: Handle Change Color Event

So, let’s handle the Change Color Event to turn the shape of the button to round again.

$(document).ready(function () {
    // Initiate the ColorPicker
    $("#mycolor").colorpicker({
        color: "#ff0000"
    });

    // Add radius to the div containing the button
    $(".evo-pointer").css("border-radius", "15px");

    // Set the radius again in ColorPicker change color event
    $(".colorPicker").on("change.color", function (event, color) {
        $(this).next().css("border-radius", "15px");
    });
});

We are assigning css property to the next element of the ColorPicker TextBox, which is the button.

Demo

[Demo] Rounded ColorPicker Button

Conclusion

I hope you enjoyed reading this blog. If you have questions, please comment below. I will try to answer. If you like it, please share on your social channels.

Thanks for reading. Have a nice day. 🙂

Microsoft MVP April 2015

Microsoft MVP 2015_Tadit Dash

Microsoft MVP 2015


I am happy to announce that I have been awarded as Microsoft MVP for the second time. Official announcement – Congratulations April 2015 Award Winners!.

Read my Story

Here. Also by my CEO Mr. Chinmoy Panda. He narrates my story in his own words. Celebrating Awesomeness

What is Microsoft MVP?

Answer : Click here to know more.

The Microsoft Most Valuable Professional (MVP) Award is our way of saying thank you to exceptional, independent community leaders who share their passion, technical expertise, and real-world knowledge of Microsoft products with others. It is part of Microsoft’s commitment to supporting and enriching technical communities. Even before the rises of the Internet and social media, people have come together to willingly offer their ideas and best practices in technical communities.

Thanks to…

:: Biplab Paul (Community Program Manager, MVP Award Program – South Asia)- for his constant support and encouragement.
:: Gandharv Rawat (Community Support Lead, MVP Award Program – South Asia) – for guiding me always to be a good leader.
:: Siddharth Rout (Microsoft MVP) – This guys listened to all my stupid queries and answered them with patience. He is still busy doing the same for me.
:: Chris Maunder (Co-Founder, CodeProject) – for rebuilding the amazing forum time to time.
:: My CEO Mr. Chinmoy Panda, who is my idol and source of inspiration for me.
:: All Code Project MVPs and Staff.
:: Everybody who appreciated my Articles, Tips, Answers and Blogs.
:: My parents, family, friends, colleagues and relatives.
:: All my Managers, Tech Leads and Reputation Manager – These guys always appreciate my recognitions, which acts as a spur to contribute more.
:: All my Microsoft Dev Community, Odisha team members, who always build and refresh me time to time to produce the best out of me.

What’s Cooking Hot !!!

Me and some of the extraordinary talented developers, community leaders along with students of Odisha have started a community named as “Microsoft Dev Community Odisha”. We are continuously organizing Technical Events, Workshops, Quizzes and many more. If you want to join the community, please fill this survey. If you want to participate in events, then follow our social channels and website. All details are as follows.

Website – msdcodisha.com
Facebook – facebook.com/MsdcOdisha
Twitter – twitter.com/MsdcOdisha
Google + – plus.google.com/+Msdcodisha

Change jQuery Slider Speed

Image Slider with Repeater

Image Slider with Repeater

Introduction

We have already talked about integrating a jQuery Slider Plugin to ASP.NET Repeater control. Now in this blog, we will change the default speed of the slider.

Background

The blog I was talking about is – ASP.NET Repeater with jQuery Slider. I explained some simple steps to integrate the jQuery Elastiside Plugin with the Repeater. This blog was a success and I received many comments as well as questions. In this blog, I will explain one of the questions, which I was asked. I am quoting that below.

Hi taditdash,

I have problem with speed. 500 is set by default. I wan to increase but no effect. I changed the value in jquery.elastislide.js (speed : 50) and also tried to change in function _validate : function() { this.options.speed = 500; value but no effect. Can you help me to fix this? Please help.

Thanks

Really very thought-provoking question.

Started my Research

I straight away opened the jQuery Plugin file and tried to see if there are any options to do this. I just searched the word “speed” and found a very interesting code block, which is given below.

$.Elastislide.defaults = {
    // orientation 'horizontal' || 'vertical'
    orientation : 'horizontal',
    // sliding speed
    speed : 500,
    // sliding easing
    easing : 'ease-in-out',
    // the minimum number of items to show. 
    // when we resize the window, this will make sure minItems are always shown 
    // (unless of course minItems is higher than the total number of elements)
    minItems : 3,
    // index of the current item (left most item of the carousel)
    start : 0,
    // click item callback
    onClick : function( el, position, evt ) { return false; },
    onReady : function() { return false; },
    onBeforeSlide : function() { return false; },
    onAfterSlide : function() { return false; }
};

Can you guess what this code block does actually? As the name $.Elastislide.defaults suggests, when we initiate the elastislide by $('#carousel').elastislide();, it sets these properties by default. So, speed is 500 ms by default.

Solution

To change the speed, we need to tell the plugin that we want a different speed and not the default one. For that, we need to pass the speed parameter to the elastislide() while initiating the elastiside. Let me code that to clarify what I mean to say.

$('#carousel').elastislide({ speed: 50 });

Now, the slider will slide speedily. If you change it to 5000, it will slide slowly.

$('#carousel').elastislide({ speed: 5000 });

Conclusion

If you have not started on jQuery Slider, then refer the blog I have already written. Any problems or suggestions, please comment below.

Thanks for reading. Have a nice day. 🙂

South Asia MVP Open Day 2015

South Asia MVP Open Day Highlights

South Asia MVP Open Day Highlights

Let me tell you one of the most mysterious thing about the MVP Open Day, which was the venue. We all tried very hard to find out the exact location of the resort. Some of us even tricked the cabby to get the information, but the organizers were way cleverer than we thought.

Just for a quick introduction on MVP Open Day…

It is is an annual regional MVP gathering to learn, connect and share experiences. We, all MVPs from South Asia, unite at one place to celebrate the “Joy of Sharing“.

So, after some time, we reached our so called “secret venue”, which was “Royal Orchid Resort at Yelahanka“. We quickly checked in and freshened up, because there were many interesting stuff already lined up for us, as you can imagine from the agenda given below.

South Asia MVP Open Day Agenda

South Asia MVP Open Day Agenda

Not getting anything from the Agenda, right !!! The same happened with us too. Keep reading, you will get know everything.

Agenda was beautifully designed, which is a combination of Technical as well as Non-Technical Sessions along with different activities and games.

Day 1 …

… started with the Introduction to MVP Program and its benefits, delivered by Mayumi Suzuki, Allen Li, Biplab Paul and Gandharv Rawat, who are our MVP Community Leads and Managers. They answered all our queries by giving us the real insight and flavour of this Program.

MVP Program Overview

MVP Program Overview

The next presenter was Dr. Nitin Paranjape, who demonstrated Office 365. We discovered many cool, useful and productive features, which we don’t really use.

One of the best quotes he made is…

“While working with any Product or Software, think whether you are helping it or that is helping you.”

This is a very powerful sentence indeed. The software is designed with all features to make our job fast and perfect, but most of the time, we try to do in our own way, ignoring all the features of the software.

Office 365 by Dr Nitin Paranjape

Office 365 by Dr Nitin Paranjape

The day then followed by sessions on Visual Studio, Office Tools and Azure by fellow MVP, Microsoft Program Managers and Experts. These sessions were informative as they addressed our daily life issues, we face with the Microsoft Products and Platforms.

How about some Game after so much of tech discussion?

Yes, you heard that right. “Paint Ball” and “Archery” were the next big things in the agenda. We formed teams among us and played the game so passionately.

MVPs playing Paintball and Archery

MVPs playing Paintball and Archery

Finally, we had a party with dinner in the evening. All the us appeared with traditional attire, which fill the place with tranquility. This was the time, when we get to know each other, chit chatted on different tech and non-tech things.

MVP Open Day Party

MVP Open Day Party

Pottery was a worth sight during the party. You can see how Mayumi is trying to build something.

On the whole, the setup mimicked “India’s Village“, where we were the Villagers. Very innovative and unique.

Mayumi with her Pottery work

Mayumi with her Pottery work

Day 2 …

… started with Yoga classes by MVP Vijay Agarwal.

Yoga Instructed by MVP Vijay Agarwal

Yoga Instructed by MVP Vijay Agarwal

Yoga, seriously !!!!

Yes, this was totally unpredicted. We were just told that to come to the lawn at 6 AM in the morning. Our Yoga Guru taught us some simple exercises, which we should work out everyday in order to stay fit in this world of technology.

Everyone was feeling so energetic after the Yoga class that eventually kept us attentive the whole day.

The first session of the day was very influential. As MVPs, we should lead the community by influencing people to work together with collaboration. We should take steps towards building those qualities by implementing the strategies explained by Mr. Sumit Arora, Director, Microsoft India IGTSC, in his presentation.

Being An Effective Influencer by Mr Sumit Arora

Being An Effective Influencer by Mr Sumit Arora

Who had imagined, that the next few hours to follow after this, would make us so involved and engaged? Pramila Matthew took the session on building leadership qualities, thereby inspiring us, not to think about the past or future, but to always live in the present with 100% concentration on the work we do.

Leadership Qualities by Pramila Matthew

Leadership Qualities by Pramila Matthew

She assigned some excellent activities to us, which we performed in groups. One of them was “Human Machine“.

Well, you can imagine the level of enjoyment we had, from the pictures below. MVPs turned into Watch, Washing Machine, Toaster etc.

Human Machine Activity

Human Machine Activity

Below one is the activity of presenting a model, which would help Microsoft to stay ahead of the curve. Many hidden, innovative and interesting ideas were projected on the floor. I hope, Microsoft would implement those in near future.

How Microsoft Will be Ahead of the Curve Presentation

How Microsoft Will be Ahead of the Curve Presentation

Then, we were all set for some tech discussions on Web Application Performance by Tulika, which is followed by Troubleshooting Azure Websites by Puneet and Security Measures in Windows 10 by Pradeep.

Designing is the most important part of a Application, because that is what user would see and create impression about it. We explored some of the Best-practices of Application Design, which was delivered by Mr. Amar from Microsoft Hyderabad.

Who can forget the late night talk on Xamarin by MVP Mayur and MVP Nishant. The talk was really very crisp and to the point, which explained us the features of Xamarin.

Sessions Collage

Sessions Collage

It was around 1 AM at that time, when everything finished. Next day around 10 AM, we checked out of the Resort and returned back to our places. But, the memories we carried from the Open Day Event is precious and will stay forever.

We are just going away for few months, before the next Open Day.

I would like to thank Mr. Biplab Paul (Community Program Manager), Mr. Gandharv Rawat (Community Support Lead) for designing such a captivating agenda, which included tech, non-tech activities and games. The communications they made before the event about the Agenda, Venue, Sessions and Goodies excited us to be a part of those two unforgettable days of this year.

MVP Open Day Goodies

MVP Open Day Goodies

Want to see all Pictures? See our Facebook Album.

South Asia MVP Team

South Asia MVP Team

Two Important Notes On RegisterStartupScript

In this Blog, we will explore some interesting stuff related to the RegisterStartupScript Method.

Showing one Alert Box

string script = "alert('Hello World !!!')";

ClientScript.RegisterStartupScript(this.GetType(), "script1", script, true);

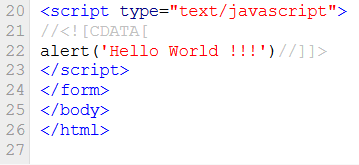
If you write this code in code behind, it will show one Alert Box on the page. Let’s see how the script is added to the page dynamically. Below is the FireBug Script View.

Example 1 Rendered Script for Alert with RegisterStartupScript

Example 1 Rendered Script for Alert with RegisterStartupScript

Showing two Alert Boxes

Now, let’s write some more codes to run another script.

string script = "alert('Hello World !!!')";
string script1 = "alert('Hello World Again !!!')";

ClientScript.RegisterStartupScript(this.GetType(), "script", script, true);
ClientScript.RegisterStartupScript(this.GetType(), "script", script1, true);

Will this work !!! Let’s try in browser and see. Only, one Alert showing on browser instead of two.

Alert Box on Browser

Alert Box on Browser

This is how it looks in script Tab of FireBug…

Example 2 Rendered Script for Alert with RegisterStartupScript

Example 2 Rendered Script for Alert with RegisterStartupScript

So, the question here is where is the next Alert? Why it did not work? Why it did not get rendered on browser?

What happened to the second Alert Box?

So, after this, I dug more into the code, after getting a coffee and try to see carefully what I have written. The second parameter of the Method is actually a key.

A startup script is uniquely identified by its key and its type. Scripts with the same key and type are considered duplicates. Only one script with a given type and key pair can be registered with the page. Attempting to register a script that is already registered does not create a duplicate of the script.

Call the IsStartupScriptRegistered method to determine whether a startup script with a given key and type pair is already registered and avoid unnecessarily attempting to add the script.

The very first line clears everything. There is also one method to check whether the script is already registered or not.

We should have Unique Keys for every Script we register

So, without further delay, I quickly changed the key. So, the code will look like…

string script = "alert('Hello World !!!')";
string script1 = "alert('Hello World Again !!!')";

ClientScript.RegisterStartupScript(this.GetType(), "script", script, true);
ClientScript.RegisterStartupScript(this.GetType(), "script1", script1, true);

Now, question is, will it work? Yes/No !!! Let’s test.

Still Not Working !!!

Oops !!! Nothing worked. Rendered script is as follows.

Example 3 Rendered Script for Alert with RegisterStartupScript

Example 3 Rendered Script for Alert with RegisterStartupScript

Can you see, what is the issue? If not, then the following image of Console will clarify all our doubts.

Example 3 Console Error

Example 3 Console Error

Head bang, we are missing Semicolons !!!

So, we are actually missing a semicolon (;) after the first line of code. In JavaScript, semicolons are optional, provided the code lines are separated by new line character. But here, RegisterStartupScript adds the scripts in one line, which bugs the page eventually. Let’s modify our code again to include semicolons after the Alert statements.

string script = "alert('Hello World !!!');";
string script1 = "alert('Hello World Again !!!');";

ClientScript.RegisterStartupScript(this.GetType(), "script", script, true);
ClientScript.RegisterStartupScript(this.GetType(), "script1", script1, true);

Now, it perfectly works, showing two Alert Boxes one after the other.

Conclusion

We explored the following points.

  • Key in the RegisterStartupScript method should be unique.
  • Each statement of JavaScript should have a semicolon at last, so that it will treat the next JavaScript statement as code.

I hope you enjoyed reading the Blog. Feel free to comment on the Blog. If you liked, please share among your friends.

DZone Most Valuable Blogger

MVB Logo

MVB Logo

Yes, you heard that right. I am now a MVB (Most valuable Blogger) of DZone. Yesterday I got the mail from Ryan Spain (Content Curator, DZone) saying…

DZone MVB Mail

DZone MVB Mail

What is the MVB Program?

Here is what DZone describes about this program:

DZone’s Most Valuable Blogger program brings together a group of highly talented bloggers, authors, and technologists actively writing about topics of interest to the developer community. These people are recognized in the industry for their contributions and deep technical knowledge on subjects ranging from software design and architecture to programming on a range of platforms including Java, .NET, Ruby and others.

Refer – About Most Valuable Blogger (MVB) Program to explore more.
My DZone profile – http://dotnet.dzone.com/users/taditdash looks really cool.

DZone MVB Profile

DZone MVB Profile

It all started…

…Way back in January, when Code Project awarded me as a Most Valuable Professional. I was contributing mostly on Forums and Social Sites. After I got the award, I started this Blog. Blogging gave me the platform to explain my day to day problems with my friends and followers.

Then, during my birthday month (April 2014), Microsoft recognized all my had work and awarded me as a Most Valuable Professional. Thanks to Mr. Biplab Paul, my MVP Lead and my fellow MVPs.

I was surprized when my CEO Mr. Chinmoy Panda wrote about me on Mindfire Solutions Blog. Let me quote couple of lines here…

His story inspires me. Coming from the small town of Nayagarh, Tadit joined Mindfire at Bhubaneswar 3 years back. After proving his worth at work, his voluntary energy led to responsibility for “extra non-work stuff”, and subsequent awards, at Mindfire. He moved ahead to receive a CodeProject MVP award few months back, and now he has received the Microsoft MVP recognition. That’s not all.

He is not only Mindfire’s first Microsoft MVP, but also the first Microsoft MVP from Bhubaneswar, a city with 10,000 software engineers! Wonderful.

Be awesome. Be Tadit.

The Blog really meant a lot me. Mindfire Solutions always encouraged my activities and motivated me to do more and more. I did not look back after that. I am also getting good response from the readers. So, I am enjoying.

Again, I would like to dedicate this to my…

Grand Father (Ganeswar Tripathy). He is always with me and guiding me towards every step I take.

What’s Next?

It’s another tag that has been added to my profile. By becoming a DZone MVB, I gave DZone permission to publish some of my blog articles on their site. This will give me chance to reach out to maximum people.

I have started speaking on Events. If you are doing any Event or know someone who is organizing, do connect them with me. I would love to speak about my Experience or about the Technology I am working on.

Following are my Social Profiles to connect with me.
Facebook – https://www.facebook.com/taditdash
Twitter – http://www.twitter.com/taditdash
LinkedIn – https://www.linkedin.com/in/taditdash
Google+ – https://plus.google.com/u/0/+TaditDash/

Also, if you have not followed my Blog, just register your mail id in the box at right side saying “Follow Blog Via Email“. All my new Blogs will be directly delivered to your inbox.

Thank you everyone for following my blog. Please don’t forget to share your feedback about my articles. This will help me to write much better contents in future.

Cascading DropDownList on GridView

Cascading DropDownLists on GridView

Cascading DropDownLists on GridView


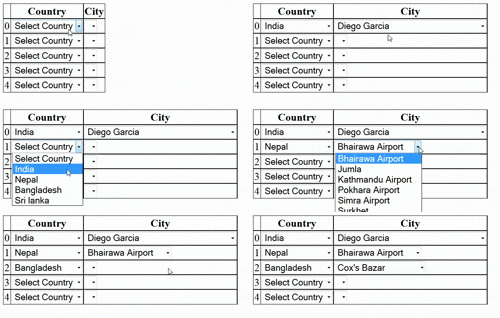
In this Blog, we will learn how to get the current Row of GridView inside the SelectedIndexChanged Event of a DropDownList present on the GridView itself and then find the other DropDownList and bind that.

Background

The requirement came up in one of my projects to Bind one DropDownList present on a Column based on the selection of DropDownList present on another Column. So, it was like the Cascading DropDownLists, where both the DropDownLists are present on the same GridView.

So, steps to get the solution would be like…

  1. Attach the SelectedIndexChanged Event for the first DropDownList on GridView
  2. Inside the Event, first get the GridView Row, from which the first DropDownList is selected
  3. Then from the current GridView Row, find the second DropDownList and bind it with a DataTable or something

The step which is bold is very important. Let’s go step by step.

GridView Markup

In the Markup, you can see that I have two DropDownLists Declared inside the GridView. One is for Country and another one for City. Just for demo purpose, I have hard coded the Items for Country. You can dynamically populate that using code.

Note: According to Step – 1, I have attached the OnSelectedIndexChanged Event to the Country DropDownList.
Goal: Our goal is to populate the City DropDownList for the particular row, when Country is selected in that row.

<asp:GridView ID="gvWithCascadingDropDownList" runat="server" AutoGenerateColumns="false">
	<Columns>
		<asp:BoundField DataField="RowNumber" />
		<asp:TemplateField HeaderText="Country">
			<ItemTemplate>
				<asp:DropDownList 
                        ID="ddlCountry" runat="server" 
                        AutoPostBack="true" 
                        OnSelectedIndexChanged="ddlCountry_SelectedIndexChanged">
					<asp:ListItem Text="-1">Select Country</asp:ListItem>
					<asp:ListItem Text="India">India</asp:ListItem>
					<asp:ListItem Text="Nepal">Nepal</asp:ListItem>
					<asp:ListItem Text="Bangladesh">Bangladesh</asp:ListItem>
					<asp:ListItem Text="Sri lanka">Sri lanka</asp:ListItem>
				</asp:DropDownList>
			</ItemTemplate>
		</asp:TemplateField>
		<asp:TemplateField HeaderText="City">
			<ItemTemplate>
				<asp:DropDownList ID="ddlCity" runat="server">
				</asp:DropDownList>
			</ItemTemplate>
		</asp:TemplateField>
	</Columns>
</asp:GridView>

What’s Next?

Let’s write code inside the Country Change Event and populate the City DropDownList.
So, according to the Step – 2

Inside the Event, first get the GridView Row, from which the first DropDownList is selected

For the above, we have to get the current Country DropDownList first, which we can easily get by.

// Get the Country DropDownList first.
DropDownList ddlCountry = (DropDownList)sender;

Now the important Step – 3.

Then from the current GridView Row, find the second DropDownList and bind it with a DataTable or something

In order to get the Containing Row for the DropDownList, we have to use the Control.NamingContainer Property.

The naming container for a given control is the parent control above it in the hierarchy that implements the INamingContainer interface. A server control that implements this interface creates a unique namespace for the ID property values of its child server controls. You can use the NamingContainer property of a naming container’s child control to get a reference to its parent container.

So, after getting the current GridView Row, now it is just a matter of finding the City DropDownList on that particular row and bind that with appropriate Data.

Below is the full code. I have used one Service to get the Cities Data. To use the Service, add Service Reference to your Project by right clicking on the Project in Visual Studio.

Service Reference Dialog

Service Reference Dialog


Service URL is – http://www.webservicex.net/globalweather.asmx?WSDL

protected void ddlCountry_SelectedIndexChanged(object sender, EventArgs e)
{
	// Get the Country DropDownList first.
	DropDownList ddlCountry = (DropDownList)sender;

	// Get the current GridView Row, from which the DropDownList is selected.
	GridViewRow currentRow = (GridViewRow)ddlCountry.NamingContainer;

	// Now let's find the City DropDownList on the same GridView Row.
	DropDownList ddlCity = (DropDownList)currentRow.FindControl("ddlCity");

	if (ddlCountry != null && ddlCountry.SelectedIndex > 0 && ddlCity != null)
	{
		string selectedCountry = ddlCountry.SelectedValue;

		// Get the Cities from the Service.
		string xmlCities = GetCitiesByCountry(selectedCountry);

		// Let's parse the XML into DataTable.
		XmlTextReader citiesReader = new XmlTextReader(new System.IO.StringReader(xmlCities));
		DataSet dsCities = new DataSet();
		dsCities.ReadXml(citiesReader);

		// Bind the City DropDownList.
		if (dsCities != null && dsCities.Tables.Count > 0 && dsCities.Tables[0].Rows.Count > 0)
		{
			ddlCity.DataSource = dsCities.Tables[0];
			ddlCity.DataTextField = "City";
			ddlCity.DataValueField = "City";
			ddlCity.DataBind();
		}
	}
	else if (ddlCity != null)
	{
		ddlCity.Items.Clear();
	}
}

private string GetCitiesByCountry(string selectedCountry)
{
	GlobalWeatherServiceReference.GlobalWeatherSoapClient client = new GlobalWeatherSoapClient();
	return client.GetCitiesByCountry(selectedCountry);
}

Hope You Enjoyed Reading

If you have any queries, please comment below. I will come back to you. Feel free to Like and Share the Blog in Social Sites.

Thanks for reading. 🙂