In this Blog, we will learn how to integrate one jQuery Slider Plugin with the ASP.NET Repeater Control.
Background
There was a question on implementation of slider with ASP.NET DataList Control and the guy who posted that was facing issues. The issue was actually due to the DataList control, which was rendering as HTML tables breaking the default jQuery Slider functionality. After researching a bit, I found that, it is very easy to implement this with the ASP.NET Repeater control. Let’s go step by step and learn.
Step by Step
Step-1 : Download jQuery Slider Plugin
You can take any jQuery Slider, but you need to see how exactly it allows contents inside it. For this example, we will be using the Elastislide. Hit the “Download Source” button on the page to download the zip file containing the Plugin files. We will try to implement the demo given here (Example 1).
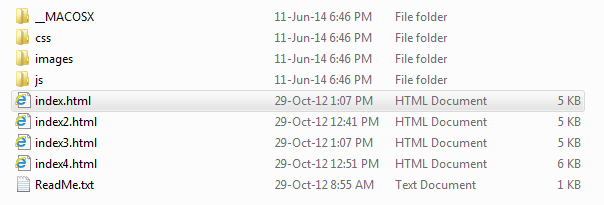
Let’s extract the zip file. You will have something like this inside the Extracted folder.
So, here we can find all related JavaScript, CSS and images used for the Demos. The demo, which we will implement with
Repeater is shown inside the index.html (highlighted in image). You can directly run and see in browser.
Step-2 : Analysis of Demo HTML Page
JavaScript and CSS Files Included
In Head section…
<link rel="stylesheet" type="text/css" href="css/demo.css" />
<link rel="stylesheet" type="text/css" href="css/elastislide.css" />
<link rel="stylesheet" type="text/css" href="css/custom.css" />
<script src="js/modernizr.custom.17475.js"></script>
In Body Section…
<script type="text/javascript"
        src="http://ajax.googleapis.com/ajax/libs/jquery/1.8.2/jquery.min.js">
</script>
<script type="text/javascript" src="js/jquerypp.custom.js"></script>
<script type="text/javascript" src="js/jquery.elastislide.js"></script>
So, we will also include these files in our aspx page.
HTML Markup for Image Slider
If you open and see the index.html page, you will find a HTML structure which loads all the images. (I have removed the not needed headers and other HTML.)
<div class="container demo-1">
	<div class="main">
		<!-- Elastislide Carousel -->
		<ul id="carousel" class="elastislide-list">
			<li><a href="#"><img src="images/small/1.jpg" alt="image01" /></a></li>
			<li><a href="#"><img src="images/small/2.jpg" alt="image02" /></a></li>
			<li><a href="#"><img src="images/small/3.jpg" alt="image03" /></a></li>
			<li><a href="#"><img src="images/small/4.jpg" alt="image04" /></a></li>
			<li><a href="#"><img src="images/small/5.jpg" alt="image05" /></a></li>
			<li><a href="#"><img src="images/small/6.jpg" alt="image06" /></a></li>
			<li><a href="#"><img src="images/small/7.jpg" alt="image07" /></a></li>
			<li><a href="#"><img src="images/small/8.jpg" alt="image08" /></a></li>
			<li><a href="#"><img src="images/small/9.jpg" alt="image09" /></a></li>
			<li><a href="#"><img src="images/small/10.jpg" alt="image10" /></a></li>
			<li><a href="#"><img src="images/small/11.jpg" alt="image11" /></a></li>
			<li><a href="#"><img src="images/small/12.jpg" alt="image12" /></a></li>
			<li><a href="#"><img src="images/small/13.jpg" alt="image13" /></a></li>
			<li><a href="#"><img src="images/small/14.jpg" alt="image14" /></a></li>
			<li><a href="#"><img src="images/small/15.jpg" alt="image15" /></a></li>
			<li><a href="#"><img src="images/small/16.jpg" alt="image16" /></a></li>
			<li><a href="#"><img src="images/small/17.jpg" alt="image17" /></a></li>
			<li><a href="#"><img src="images/small/18.jpg" alt="image18" /></a></li>
			<li><a href="#"><img src="images/small/19.jpg" alt="image19" /></a></li>
			<li><a href="#"><img src="images/small/20.jpg" alt="image20" /></a></li>
		</ul>
		<!-- End Elastislide Carousel -->
	</div>
</div>
This structure is most important, because the classes added to the HTML controls are used inside the CSS and JavaScript files.
So, we just need to replace the “list items (li)” inside the “Unordered Lists” with Repeater Items, which eventually would look like the same structure and render all the image URLs inside List Items.
Step-3 : Create a Web Application and Add one aspx Page
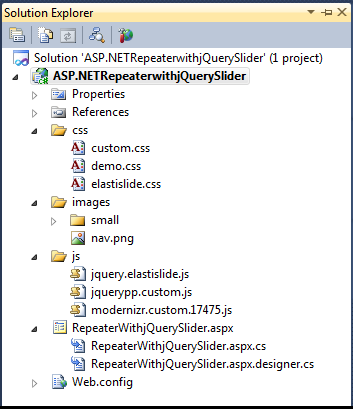
After adding the aspx page to the Project, now we need to copy the js, css files and images from the “Downloaded Plugin” folders. So, Solution Explorer would look like…
NOTE : We have maintained the exact folder structure as in the Downloaded Plugin. Only “small” folder inside “images” folder is copied with another the “
nav.png” image used for “previous next” buttons.
Step-4 : Let’s Design the aspx Page
Basically, we will copy the HTML present in index.html page and update it by adding one Repeater.
Now, the div would look like…
<div class="container demo-1">
	<div class="main">
		<ul id="carousel" class="elastislide-list">
			<asp:Repeater ID="mylist" runat="server">
				<ItemTemplate>
					<li><a href="#">
						<asp:Image ID="Image1" runat="server" ImageUrl='<%# "images/small/" + Eval("image")%>' />
					</a></li>
				</ItemTemplate>
			</asp:Repeater>
		</ul>
	</div>
</div>
:: Here ImageUrl Property is a combination of folders path and image name. Image Name is dynamically bound from the Datasource (explained in the next step), EVAL is used for this purpose only.
Next we will add the JavaScript and CSS files in the Page just like it appears in the index.html Page.
Now, most important thing is to add the following script inside the body.
<script type="text/javascript">
    $('#carousel').elastislide();
</script>
This code actually invokes the Slider to work. carousel is the id of the ul (Unordered list) element in HTML. This elastislide(); method is present in the Plugin js.
Step-5 : Bind the Repeater from Code Behind
protected void Page_Load(object sender, EventArgs e)
{
	if (!Page.IsPostBack)
	{
		BindRepeater();
	}
}

/// <summary>
/// This method binds the Image Slider.
/// </summary>
private void BindRepeater()
{
	DataTable dt = new DataTable();
	dt.Columns.Add("image");

	for (int i = 1; i <= 20; i++)
	{
		dt.Rows.Add(i + ".jpg");
	}

	mylist.DataSource = dt;
	mylist.DataBind();
}
This code is very simple. It binds the Repeater from a DataTable, which contains rows as image names. Image names are 1.jpg, 2.jpg till 19.jpg. You can put your image binding logic here to bind the Repeater.
Feedback Equips Me !!!
Please put your thoughts on the Project by commenting below the Blog. Like and Share, if you liked it.


In the head section we need to reference the jquery libraries right ?….Anyway it really helped me to create slider…Thanks
LikeLiked by 1 person
Hi Guru,
Thanks for reading the Blog. Glad it helped you. 🙂
Refer “Step-2 : Analysis of Demo HTML Page”, where I mentioned to add the jQuery library reference in
bodysection. You can also include that inheadsection. But don’t duplicate the same inheadas well asbody. There should be only one reference declared in page to avoid conflict and overhead.I added that in body section as it was did in the Demo HTML page in the Plugin. 🙂
Regards,
Tadit
LikeLike
Good job Tadit! I’m actually implementing one at work this week. I do have a question. Why are you putting the scripts in the body, and not in the head?
LikeLiked by 1 person
Hello Luis,
Thanks for reading the Blog. 🙂
There is no such reason why I put those scripts in the
bodysection. I just tried to keep the same structure as in the demoHTMLpage present in the Plugin.You can put those in
headsection as well. Only thing you need to do is that you have to call the Plugin method inside$(document).ready();to initiate the Slider, like…<script type="text/javascript"> $(document).ready(function(){ $('#carousel').elastislide(); }); </script>Thanks,
Tadit
LikeLike
VERY NICE! Sir can you do it again but pictures comes from database
LikeLiked by 1 person
Hi KEN,
Thanks for reading the Blog. 🙂
When you store images in Database, you either store the URLs or the Paths/Names. If you store paths, then it just a matter of getting those in a
DataTableand bind that to theRepeater.Feedback taken. Will come up with a Blog in future. Adding to Todo. 🙂
Thanks,
Tadit
LikeLike
I tried to make this twice on my HTML page.. the first result was fine but the second one does not work.. 😦
Can you help me please 😦
LikeLiked by 1 person
Hey KEN,
Thanks for referring this Blog. 🙂
Did you download the project (the link is given at the top)? Just download and try. See how the page is structured.
Thanks,
Tadit
LikeLike
Yes sir I’ve downloaded it already but codes seems difficult to understand (hehe sorry for my bad English) .
I tried to put this codes twice:
Elastislide A Responsive Image Carousel
Example 1
Example 2
Example 3
Example 4
Resize the browser to see how the carousel adapts
Example 1: A minimum of 3 (default) images are always visible.
$( ‘#carousel’ ).elastislide();
First one works well.
But the the result of the second codes doesn’t work properly..
😦 ..
I know you can help me Sir .. thank you in advance 🙂
and also thanks for replying on my comment 🙂
LikeLiked by 1 person
aww.. Sorry Sir.. the codes I’ve entered twice is this:
”
Elastislide A Responsive Image Carousel
Example 1
Example 2
Example 3
Example 4
Resize the browser to see how the carousel adapts
Example 1: A minimum of 3 (default) images are always visible.
$( ‘#carousel’ ).elastislide();
”
Hope it appers as codes not result.. 😀
LikeLiked by 1 person
I used the codes in for HTML and PHP files not for ASp 🙂
LikeLiked by 1 person
Sir??
LikeLiked by 1 person
Hey KEN,
I don’t understand how exactly you are trying this. I don’t work in PHP, so I don’t know what control you are using and how you are binding that with the images. Please see the Developer Tool Console Tab, if there are any errors or not. If you find any error, correct them.
If the images are missing, that means issue is with the image URLs.
Thanks,
Tadit
LikeLike
AMAZING tutorial, Thanks mate.
LikeLiked by 1 person
Thanks khedma. 🙂
Keep visiting and stay updated. You can follow to get the latest Blog updates. Just click “Follow” on right side panel.
Regards,
Tadit
LikeLike
Hi taditdash,
I have problem with speed. 500 is set by default. I wan to increase but no effect. I changed the value in jquery.elastislide.js (speed : 50) and also tried to change in function _validate : function() { this.options.speed = 500; value but no effect. Can you help me to fix this? Further I need to show only one image at one time and need navigation to move on next and previous image. Please help.
Thanks
LikeLike
Hi Rashid,
Thanks for reading. 🙂
I found the solution to change the speed. You need to pass the argument while calling the Event like…
$('#carousel').elastislide({ speed: 50 });I tested, this works. But I could not find any option to show only one image on the slider. You can request this feature on their Guthub Project – https://github.com/codrops/Elastislide.
Regards,
Tadit
LikeLike
Hi Mate,
You have implemented a nice Slider.
I have only one query . Can we make the images in the repeater Hyperlinks or Clickable, means all the images can go to the
different URLs.
Please help me out on this.
Thanks in Advance,
Nitin Kumar Tyagi
LikeLiked by 1 person
Hi Nitin,
Thanks for reading the Blog. 🙂
Yes you can add HyprLinks. Actually the tag is already added in the markup, you can check. You just need to assign proper URL to it.
Thanks,
Tadit
LikeLike
Hi Tadit!
Your post has been really helpful in a project I am working on. I have implemented content slider using your logic. Thank you!
I need your help in a particular case where, I want the slider to focus on a specific index (say, 3rd item) on postback than the default position (1st index). Is there any way I can do it?
LikeLiked by 1 person
Hey Linda,
Thanks for the comment. 🙂
Sorry for replying late. Busy at work.
Fortunately, there is an easy way to focus on an index of your choice. Try the code written below.
$('#carousel').elastislide({ start: 2 }); // For 3rd ItemLet me know if that works for you.
Thanks,
Tadit
LikeLike